DIY Styrofoam Aquarium Background
By Alasse from Everything Aquatic Forum
Forum Thread Reference:
5ft DIY Background
This is the process to making the background that is in my 5ft Angel tank:
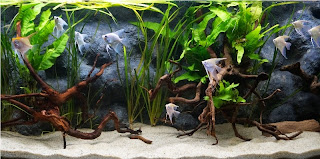
All pictures can be clicked on to enlarge.
What was used:
*Important!
Write down the Render/Oxide/Water ratio!!!
The render dries quite a bit lighter than when its first applied, especially the Acrylic render I have linked in below, it dries white or very very close to.
Oxide colours can go a long way, small amounts and build to get a look you like.
Make sure to do regular tank fittings and remember adding layers of render adds height and width the the Background.
Expanding foam does just that, so don't get to boisterous with it lol Small and build!!
Be observant of making really hard to get to areas, once in the tank you have to try and seal these areas, and it can be difficult.
You need to work out what filtration you are having on the tank before you start, as intakes and output areas need to be factored in (the one above has filter, power head & heaters behind the BG.
Do not render areas that are going to be silicone to the glass to secure BG (back ground) into tank.
Do not think you wont need to silicone it in, foam is EXTREMELY buoyant!!
These backgrounds are designed to be permanent (you can get them out if need be, but the BG will NOT survive the process!)
Be sure you give the render time to cure, dependant on thickness, the thicker you make the layers, the longer curing time it takes.
The render MUST be fully cured (dry) before sealing!
Most pond sealers like to eat foam, so extra care is needed to just coat the render.
If the BG messes with you PH, you didn't seal it properly. It is messy to do, but a lot of fun lol.
On completion you have a totally one off BG that no one else can ever have :)
30th December 2013 - The basic foam work
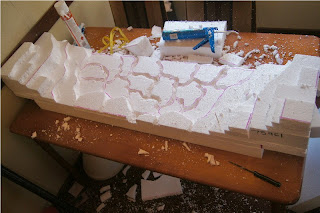
30th Dec 2013 - Expanding spray foam added
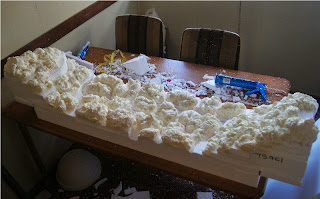
3rd Jan 2014 - Tank fitting
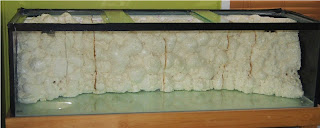
11th Jan 2014 - 1st coat of render done
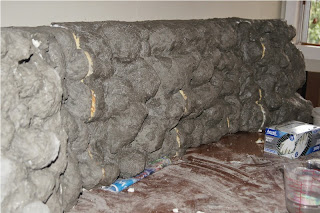
11th Jan 2014 - 2nd coat of render done
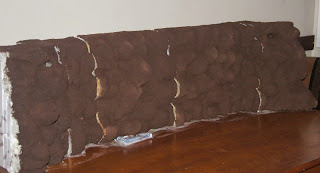
13th Jan 2014 - 3rd coat of render done

15th Jan 2014 - Highlighting done
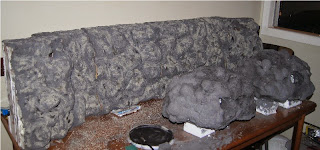
24th Jan 2014 - Siliconed into tank

18th Mar 2014 - Joins done - Now I hit a glitch here, I didn't write down the render/oxide/water ratios and could not match the colour, so yep I have to give it a 4th coat and re-highlight it

24th Mar 2014 - tank out side ready to seal

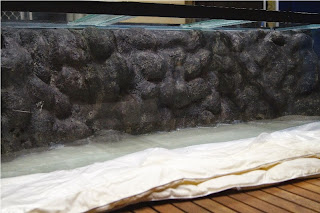
29th Mar 2014 - Tank fully sealed and ready to put back on stand
Material Resources:
I use this render:
Dunlop Acrylic Render
I have used this sealer:
Crommelin Pondsealer
Silicone I use:
Selleys Glass Silicone
Oxides:
Australian Builders Oxide Powder
All of the above is available at Bunnings Warehouse :)
*note above is for Australians
For USA/Canada:
Premium USDA Safe Aquarium Silicone
Pond Sealer
FURTHER SUGGESTED RESOURCES:

Freshwater Aquarium Care; Basics to Advanced

Aquarium Lighting Facts & Information

Why PUR Is More Important than PAR for Aquarium Lighting
A must read article for anyone wanting to move from basic aquarium lighting to more advanced.
It is noteworthy that optimal PUR lighting is not only important for planted or reef aquariums, but for overall health of "fish only" tanks and compliments other aspects of optimal fish care such as feeding and chemistry.

TMC Premium Fluidized Sand Bed Filters
Premium, second to NONE Aquarium Bio Filters, that with optional Oolitic Sand, also maintains essential aquarium calcium levels, alkalinity, & electrolytes that are important to ALL Marine life, Goldfish, African Cichlids, Livebearers & more

Aquarium Sponge Filters
Forum Thread Reference:
5ft DIY Background
This is the process to making the background that is in my 5ft Angel tank:

All pictures can be clicked on to enlarge.
What was used:
- Styrofoam
- Expanding foam
- Breadknife
- Sharp knife
- Lighter
- Silicone
- Flyscreen mesh - For covering output and intake areas)
- Paintbrushes - Various sizes
- Water
- Paper towel
- Gloves
- Render - approx. 18kg
- Oxides - Brown & Black
- Sealer - Clear pond sealer can be used, this will make the background inert. (not what I use on this one or later ones, but pond sealer will do the job)
*Important!
Write down the Render/Oxide/Water ratio!!!
The render dries quite a bit lighter than when its first applied, especially the Acrylic render I have linked in below, it dries white or very very close to.
Oxide colours can go a long way, small amounts and build to get a look you like.
Make sure to do regular tank fittings and remember adding layers of render adds height and width the the Background.
Expanding foam does just that, so don't get to boisterous with it lol Small and build!!
Be observant of making really hard to get to areas, once in the tank you have to try and seal these areas, and it can be difficult.
You need to work out what filtration you are having on the tank before you start, as intakes and output areas need to be factored in (the one above has filter, power head & heaters behind the BG.
Do not render areas that are going to be silicone to the glass to secure BG (back ground) into tank.
Do not think you wont need to silicone it in, foam is EXTREMELY buoyant!!
These backgrounds are designed to be permanent (you can get them out if need be, but the BG will NOT survive the process!)
Be sure you give the render time to cure, dependant on thickness, the thicker you make the layers, the longer curing time it takes.
The render MUST be fully cured (dry) before sealing!
Most pond sealers like to eat foam, so extra care is needed to just coat the render.
If the BG messes with you PH, you didn't seal it properly. It is messy to do, but a lot of fun lol.
On completion you have a totally one off BG that no one else can ever have :)
30th December 2013 - The basic foam work

30th Dec 2013 - Expanding spray foam added

3rd Jan 2014 - Tank fitting

11th Jan 2014 - 1st coat of render done

11th Jan 2014 - 2nd coat of render done

13th Jan 2014 - 3rd coat of render done

15th Jan 2014 - Highlighting done

24th Jan 2014 - Siliconed into tank

18th Mar 2014 - Joins done - Now I hit a glitch here, I didn't write down the render/oxide/water ratios and could not match the colour, so yep I have to give it a 4th coat and re-highlight it

24th Mar 2014 - tank out side ready to seal

29th Mar 2014 - Tank fully sealed and ready to put back on stand

Material Resources:
I use this render:
Dunlop Acrylic Render
I have used this sealer:
Crommelin Pondsealer
Silicone I use:
Selleys Glass Silicone
Oxides:
Australian Builders Oxide Powder
All of the above is available at Bunnings Warehouse :)
*note above is for Australians
For USA/Canada:
Premium USDA Safe Aquarium Silicone
Pond Sealer
FURTHER SUGGESTED RESOURCES:
Freshwater Aquarium Care; Basics to Advanced
Aquarium Lighting Facts & Information

Why PUR Is More Important than PAR for Aquarium Lighting
A must read article for anyone wanting to move from basic aquarium lighting to more advanced.
It is noteworthy that optimal PUR lighting is not only important for planted or reef aquariums, but for overall health of "fish only" tanks and compliments other aspects of optimal fish care such as feeding and chemistry.
TMC Premium Fluidized Sand Bed Filters
Premium, second to NONE Aquarium Bio Filters, that with optional Oolitic Sand, also maintains essential aquarium calcium levels, alkalinity, & electrolytes that are important to ALL Marine life, Goldfish, African Cichlids, Livebearers & more
Aquarium Sponge Filters
Labels: angel aquarium, aquarium back ground, aquarium background, DIY aquarium back ground


 AAP AquaRay LED; GroBeam, AquaBeam